
As the owner of an industrial testing laboratory, I see the critical role that tensile testing plays
in product safety and quality every single day. From the steel beams holding up our bridges to
the plastic components in our medical devices, knowing how much stress a material can handle
before it breaks is not just a regulatory requirement. It is a matter of public safety. This is where
tensile testing comes in.
However, over the years, I have also seen a lot of good materials fail simply because of bad
testing practices. tensile testing is only as good as the preparation and execution behind it. Even
smal errors can lead to wildly inaccurate results. This can cause you to reject perfectly good
materials or, worse, approve materials that are destined to fail in the field.
In this guide, I want to walk you through the most common mistakes that ruin tensile test
results. By avoiding these errors, you can ensure your data is reliable, your products are safe,
and your reputation remains intact.
Why Accurate Tensile Testing Matters
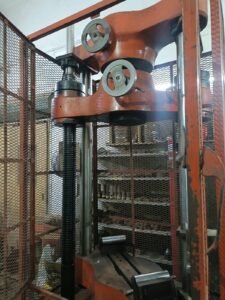
Before we dive into the mistakes, let us quickly cover why this matters so much. A tensile testing
measures the force required to break a material and the extent to which the specimen
stretches or elongates to that breaking point.
The data we get from these tests, such as yield strength, ultimate tensile strength, and
elongation at break, are fundamental properties. Engineers use these numbers to design
products. If your tensile test results are wrong, the engineering calculations wi l be wrong.
Getting this right is crucial for quality control, material selection, and meeting industry
standards like ASTM or ISO. If you need a reliable partner for your material testing needs, you
can always reach out to our team at theidtl.com. We pride ourselves on accuracy and precision.
Now, let us look at where things often go wrong.
Mistake 1: Poor Specimen Preparation
This is, without a doubt, the most common source of error I see in our lab. The sample you are
testing must be a perfect representation of the material. If the sample is flawed, the test results
wi l be flawed.
Incorrect Machining and Cutting
When you cut or machine a test specimen, you can easily introduce stress or change the
properties of the material right at the edges. For example, using dul tools or cutting too quickly
can cause excessive heat. This heat can harden or soften the edges of your metal or plastic
sample, altering its tensile strength.
How to fix it: Always use sharp tools and proper cooling methods during machining. Folow the
specific guidelines for specimen preparation outlined in your testing standard (like ASTM E8 for
metals or ASTM D638 for plastics).
Surface Scratches and Imperfections
Any scratch, notch, or dent on the surface of your test sample acts as a stress concentrator.
When you pul the material, the stress wil focus on that tiny flaw, causing the material to break
prematurely. You wi l end up with a lower ultimate tensile strength reading than the material
actua ly possesses.
How to fix it: Inspect every specimen carefuly before testing. The surface should be smooth
and free of any visible defects. If you find a scratch in the gauge length area, discard the
sample and prepare a new one.
Inaccurate Dimensional Measurements
The cross-sectional area of your specimen is a key part of the stress calculation (Stress = Force
/ Area). If you measure the width or thickness of your sample incorrectly, your final stress
values wi l be wrong.
How to fix it: Never guess. Use calibrated micrometers or calipers to measure the dimensions
of every single specimen before testing. Take multiple measurements along the gauge length
and use the average.
Mistake 2: Using the Wrong Grips or Incorrect
Gripping Techniques
How you hold the material during the test is just as important as the material itself. The grips of
your universal testing machine (UTM) must hold the sample securely without causing damage.
Slippage During the Test
If your grips are not tight enough, or if you are using the wrong type of grip surface for the
material, the specimen wi l slip as the tension increases. This slippage looks like false elongation
on your graph and ruins your strain data.
How to fix it: Choose the right grips for the job. Use serrated jaws for hard metals and smooth
or rubber-coated jaws for softer materials like plastics or rubber. Ensure the gripping pressure
is sufficient to hold the sample but not so high that it crushes it.
Jaw Breaks
A jaw break happens when the specimen breaks inside or right at the edge of the grips, rather
than in the middle of the gauge length. This usualy means the grips were too tight, creating a
stress concentration point. Results from a jaw break are invalid because they do not represent
the true tensile strength of the material.
How to fix it: Check your grip pressure and alignment. Consider using pneumatic or hydraulic
grips that a low for precise pressure control. If you consistently get jaw breaks, you may need
to use a different specimen shape, like a dog-bone shape, which encourages the break to
happen in the middle.
Mistake 3: Poor Alignment of the Testing Machine
If your testing machine is not perfectly aligned, you are introducing bending forces into your
tensile test. A tensile test is supposed to apply purely axial pu ling force (straight up and down).
When a specimen is puled at an angle, one side of the material experiences more stress than
the other. This wi l cause the material to fail prematurely, giving you lower strength values.
Alignment issues are common when testing rigid materials like high-strength steel or
composites.
How to fix it: Regularly check the alignment of your universal testing machine. Use alignment
fixtures and folow the manufacturer’s maintenance schedule. Proper alignment ensures that
the force is distributed evenly across the entire cross-section of your sample.
Mistake 4: Incorrect Testing Speed
The speed at which you pul the material, known as the strain rate, significantly affects the
results. Materials behave differently depending on how fast they are stretched.
Pulling Too Fast
If you pul a material too quickly, it often appears stronger and more brittle than it actualy is.
The material does not have time to yield and stretch naturaly. This is especialy true for
polymers and plastics, which are highly sensitive to strain rates.
Pulling Too Slow
Conversely, pu ling too slowly can alow the material to stretch more than it would under normal
conditions, making it appear more ductile.
How to fix it: Always strictly adhere to the testing speed specified in your relevant testing
standard. The standard wil tel you exactly how fast the crosshead should move during the
elastic region and the plastic region of the test.
Mistake 5: Ignoring Environmental Factors
The environment in your laboratory can have a surprisingly large impact on your tensile test
results. You cannot test materials in a freezing garage one day and a sweltering warehouse the
next and expect consistent data.
Temperature Fluctuations
Temperature changes drasticaly affect the mechanical properties of many materials,
particularly plastics, rubber, and composites. A material that is tough at room temperature
might become brittle if the lab is too cold, or overly soft if the lab is too hot.
Humidity Levels
Humidity can also play a role, especia ly for materials that absorb moisture, like nylon or certain
natural fibers. Absorbed moisture can act as a plasticizer, lowering the tensile strength and
increasing elongation.
How to fix it: Control your lab environment. Keep the temperature and humidity levels
consistent and within the ranges specified by your testing standards. If you must test materials
at extreme temperatures, use an environmental chamber attached to your testing machine.
Mistake 6: Using Uncalibrated Equipment
This might seem obvious, but it is a mistake I see happen too often. If your load cel (the part
that measures the force) or your extensometer (the part that measures the stretch) is not
calibrated, your data is essentia ly useless.
A load cel can drift over time due to heavy use or accidental overloading. An extensometer can
get bumped out of alignment. If you do not catch these issues, you wil be recording inaccurate
force and strain data.
How to fix it: Implement a strict calibration schedule. Your load cels, extensometers, and
measuring tools (like calipers) should be calibrated by a certified professional at least once a
year, or more frequently if they see heavy use. Always keep your calibration certificates up to
date.
Conclusion
Accurate tensile testing is the foundation of reliable product manufacturing and structural
safety. As a lab owner, I cannot stress enough how important it is to pay attention to the details.
By avoiding these common mistakes—ensuring proper specimen preparation, using the right
grips, maintaining machine alignment, contro ling your test speed, managing your environment,
and calibrating your equipment—you can trust the data your lab produces.
Remember, taking shortcuts in material testing never pays off in the long run. If you want to
ensure your materials meet the highest standards, focus on precision every step of the way.
And if you are looking for an independent testing facility that understands these nuances, visit
theidtl.com to see how we can support your quality control processes.